
If you’ve seen guides warning you to install WSL2 before Ollama will work on Windows — ignore them. That requirement was dropped years ago. Ollama has run natively on Windows since version 0.3, and as of 2026 it ships a built-in desktop app with a real chat window, so you don’t have to touch a terminal at all if you’d rather not.
This guide covers both paths: the graphical installer and the single-command winget method. Either way, you’ll be running your first local AI model in about five minutes.
On a Mac? See the Apple Silicon guide.
Contents
- 1 What You Need Before Starting
- 2 The Install Flow
- 3 Method 1: Graphical Installer (Recommended for Most People)
- 4 Method 2: winget (One Command)
- 5 What Gets Installed
- 6 Running Your First Model
- 7 Using the Desktop App Instead of the Terminal
- 8 GPU Acceleration
- 9 If a Model Is Too Large for Your VRAM
- 10 Common Issues
- 11 What to Run Next
- 12 Hello, Nice to meet you!
What You Need Before Starting
Three things worth checking before you download anything:
Windows version — Windows 10 (version 1903 or later) or Windows 11, 64-bit. If you’re on an older version, the installer will tell you.
RAM — at least 8GB to run a 7B-class model comfortably. 16GB opens up the mid-size range. If you’re not sure what you can run, check our hardware matcher after installing.
Admin rights — not required. The standard Ollama installer works on a regular user account.
That’s it. No CUDA toolkit to install separately, no WSL2, no Docker, no Python environment to manage.
The Install Flow
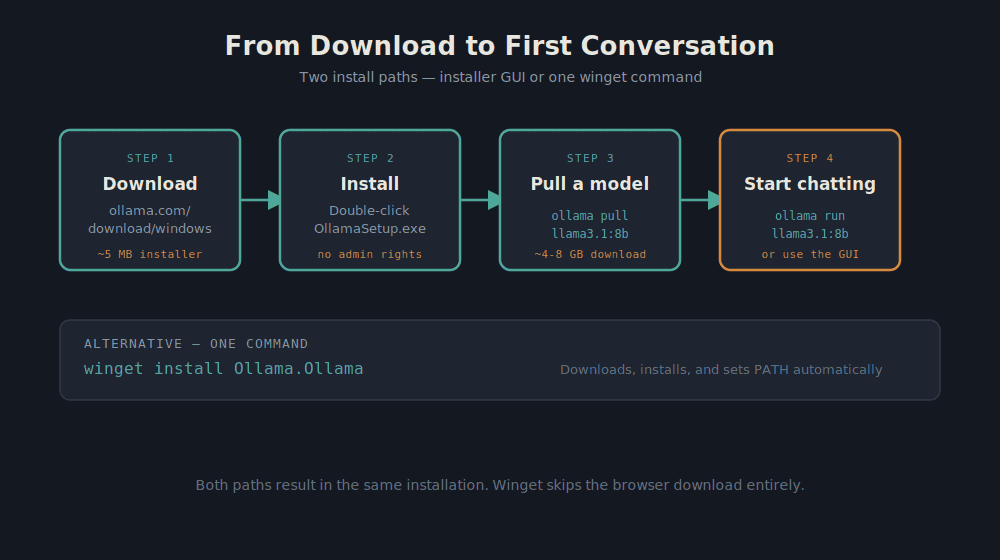
Both install paths land you in the same place — Ollama running as a background service, a system tray icon in your taskbar, and a command available in PowerShell. The winget path just skips the browser entirely.
Method 1: Graphical Installer (Recommended for Most People)
Step 1 — Go to ollama.com/download/windows and download OllamaSetup.exe. The file is roughly 5MB.
Step 2 — Double-click the installer. Windows SmartScreen may show a “Windows protected your PC” warning — this appears for unsigned executables. Click More info then Run anyway. The official installer from ollama.com is safe; only dismiss this warning if you downloaded from the official source.
Step 3 — Click through the one-page wizard. The installer does not need administrator rights for a standard user install. It also sets up the PATH for you automatically, so the ollama command becomes available in PowerShell.
Step 4 — Open a new PowerShell or Command Prompt window. This is important: any terminal that was already open before the install won’t see the updated PATH. Then run:
ollama --version
If you see a version number, the install worked.
Method 2: winget (One Command)
If you’re comfortable in PowerShell, this installs Ollama without opening a browser:
winget install Ollama.Ollama
That downloads the installer, runs it, and handles PATH configuration automatically. Verify the same way afterward — open a new terminal and run ollama --version.
What Gets Installed
After either method, Ollama:
– Starts automatically as a background Windows service
– Adds an icon to your system tray (bottom-right, near the clock)
– Listens on localhost:11434 — the local API endpoint that other apps use to talk to it
– Asks Windows Firewall for permission the first time it starts — click Allow access for private networks. This only enables localhost connections, nothing is exposed to the internet.
Running Your First Model
Open a new PowerShell window and pull a model. For a 7B-class model that runs on most hardware with 8GB of RAM:
ollama pull llama3.1:8b
This downloads roughly 4-5GB — the speed depends on your connection. Ollama resumes interrupted downloads automatically if your connection drops, so you don’t need to babysit it.
Once the download finishes, start chatting:
ollama run llama3.1:8b
You’ll get a >>> prompt in the terminal. Type a question and hit Enter. Type /bye to exit when you’re done.
Using the Desktop App Instead of the Terminal
Since Ollama v0.10.0 (July 2025), the same installer includes a desktop chat interface — no terminal required. After installing, look for the Ollama icon in your system tray, click it, and the chat window opens directly.
The desktop app and the terminal command use the same models and the same service running underneath. There’s no difference in what models you can access or how they perform — it’s purely a preference for how you interact with them.
GPU Acceleration
Without a GPU, Ollama runs models on your CPU — functional but noticeably slower (roughly 5-12 tokens per second on a modern CPU for a 7B model). With a GPU, that typically jumps to 40-80+ tokens per second, depending on the card.
Ollama auto-detects your GPU when it starts. For this to work:
NVIDIA — You need driver version 527 or later. Check what you have by running nvidia-smi in PowerShell. If it shows a version number below 527, update your driver from nvidia.com/drivers. The CUDA toolkit does not need to be installed separately — Ollama bundles what it needs.
AMD — DirectML is built into Windows and usually detected automatically. No additional driver installation is needed for most setups.
To confirm Ollama is actually using your GPU once you’re running a model, check Task Manager → Performance → your GPU — you should see utilisation climbing while the model is generating a response.
If a Model Is Too Large for Your VRAM
If a model’s VRAM requirement exceeds what your card has, Ollama doesn’t fail completely — it automatically splits the model between GPU and CPU. The GPU handles as many layers as fit, the CPU handles the rest. A model running 20% on CPU is roughly 3-5x slower than full GPU inference, but it works. Use our hardware matcher to find models that fit entirely on your GPU for the best experience.
Common Issues
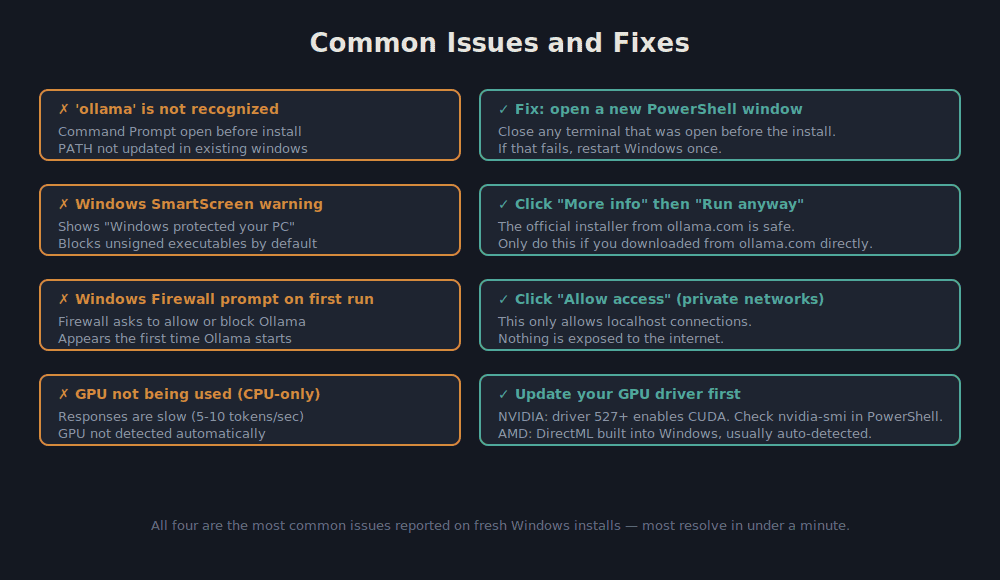
The four issues in the diagram above cover the vast majority of problems on fresh Windows installs. All of them resolve in under a minute once you know the cause.
What to Run Next
Now that Ollama is installed, the question is which model to pull. Our 7B models page lists every model in that hardware-friendly range with RAM requirements and benchmarks. If you want to match your exact setup to what fits, the hardware matcher takes your available RAM and returns the specific models that will actually run.
For a broader overview of what each model size is good for, the Getting Started guide covers use-case matching in more depth.